OpenSearch integration
Using OpenSearch as the vector database for OPEA
OpenSearch is a search, analytics, and vector database solution. The OpenSearch Software Foundation, is a member of the Linux Foundation, providing open governance, for the OpenSearch project on GitHub. Amazon OpenSearch Service provides a managed experience that makes it easy to deploy, scale, and operate OpenSearch in the AWS cloud. Whether you’re self-managing OpenSearch in the cloud, on premises, or using Amazon OpenSearch Service, OpenSearch provides the vector capabilities you need to build fast, accurate, and high-scale lexical and semantic search, to retrieve relevant results for your website and Generative AI application.
OpenSearch is a search engine at its core. We’re all familiar with search engines like web search engines, and product search engines. We use them daily to find information, products we want to buy, places we want to travel, and where we want to eat. When you use a search engine, you provide a text query, possibly augmented with some clickable attribute values, to express your information goal, and the search engine’s job is to send back a set of search results that (hopefully) are relevant to meeting the information goal that motivated your search.
Search engines are specialized members of the databases world, designed to work in tandem with another data store (usually a relational database), to provide low-latency, high throughput search on large blocks of unformatted text; more structured, “metadata” fields that can contain text or numbers; and vectors. The core construct for search engines is the index, which, like a database table, is the container for data elements. In OpenSearch, the data elements are called documents, which are Javascript Object Notation (JSON) objects. Documents contain fields, which are the JSON keys (including all of the nested JSON), and values, which are the values for the keys. You query document fields with text, numbers and numeric ranges, dates, geographic information, etc. to retrieve matching documents. When your queries involve matching unstructured text, OpenSearch sorts documents based on a relevance (similarity) score that favors matching words that are uncommon in the overall corpus of documents, and concentrated in the document.
Recent advances in natural language have expanded the possibilities for how we interact with and retrieve relevant information. Large Language Models (LLMs) are able to encode language into high-dimension vector spaces, capturing the meaning of language in a way that enables matching meaning for meaning. Additionally, LLMs are capable of generating realistic natural-language responses for natural-language questions. Locating information now involves the possibility of conversing with a chat bot, adding textual and other types of information like images, audio, and video to the way you specify your information goal.
OpenSearch has two different uses in AI scenarios. OpenSearch can store and use vector embeddings, produced by embedding LLMs, to perform semantic search. In semantic search, OpenSearch uses nearest-neighbor matching on an embedding produced by the query to find neighbors in the vector space. In generative AI, OpenSearch can serve as the knowledge base for retrieving relevant information to add to the prompt. You’ve already seen how Redis can serve as a vector database. In this Task, you’ll explore OpenSearch’s search capabilities, its vector capabilities, and see how it integrates with OPEA. ::::
How does the architecture change?

Thanks to the interchangeability offered by OPEA, most of the components from the default ChatQnA example (Module 1). Of course, for this module, you’ll need to deploy OpenSearch. Additionally, you’ll use a retriever and a data prep microservice designed to work with OpenSearch’s query and indexing APIs. You can find these components in the OPEA GitHub project’s components directory.
Deploying ChatQnA using OpenSearch as vector database
For this lab, we’ve created a changeset that you can deploy that contains a full, parallel deployment of the ChatQnA example, in the same Kubernetes cluster you’ve been using. We’ve wrapped all of the changes you need in an AWS CloudFormation changeset that you deploy with the command below.
We’ve used a Kubernetes namespace, opensearch, to separate out the pods and services pertaining to the OpenSearch deployment. When you use kubectl and other Kubernetes commands in the below examples, be sure to qualify the command with -n opensearch.
Return to your Cloud Shell. If the shell has terminated, click in the window to open a new command line, or use the icon at the top of the AWS console to start a new Cloud Shell. Use the following command to deploy the OpenSearch change set.
aws cloudformation execute-change-set --change-set-name opensearch-change-set --stack-name OpeaOpensearchStack
OpenSearch will take a few minutes to deploy. To check the status, you can use kubectl to monitor the state of the OpenSearch pods. You can use the command
kubectl get pods -n opensearch
to get output like this
NAME                                                READY   STATUS    RESTARTS   AGE
chatqna-chatqna-ui-deployment-77dbdfc949-8nzcd      1/1     Running   0          19h
chatqna-data-prep-deployment-56758cbb64-w7xzl       1/1     Running   0          19h
chatqna-deployment-df57cc766-6v9lf                  1/1     Running   0          19h
chatqna-nginx-deployment-5dd47bfc7d-fpxfj           1/1     Running   0          19h
chatqna-retriever-usvc-deployment-d7d687c75-qjqf5   1/1     Running   0          19h
chatqna-tei-deployment-769dc796c-p6hxx              1/1     Running   0          19h
chatqna-teirerank-deployment-54f58c596c-8xv8x       1/1     Running   0          19h
chatqna-tgi-deployment-d9c6c44d8-p2nmx              1/1     Running   0          19h
opensearch-cluster-master-0                         1/1     Running   0          19h
Only continue when you see the opensearch-cluster-master-0 pod in the Running state.
Changes to ChatQnA for OpenSearch
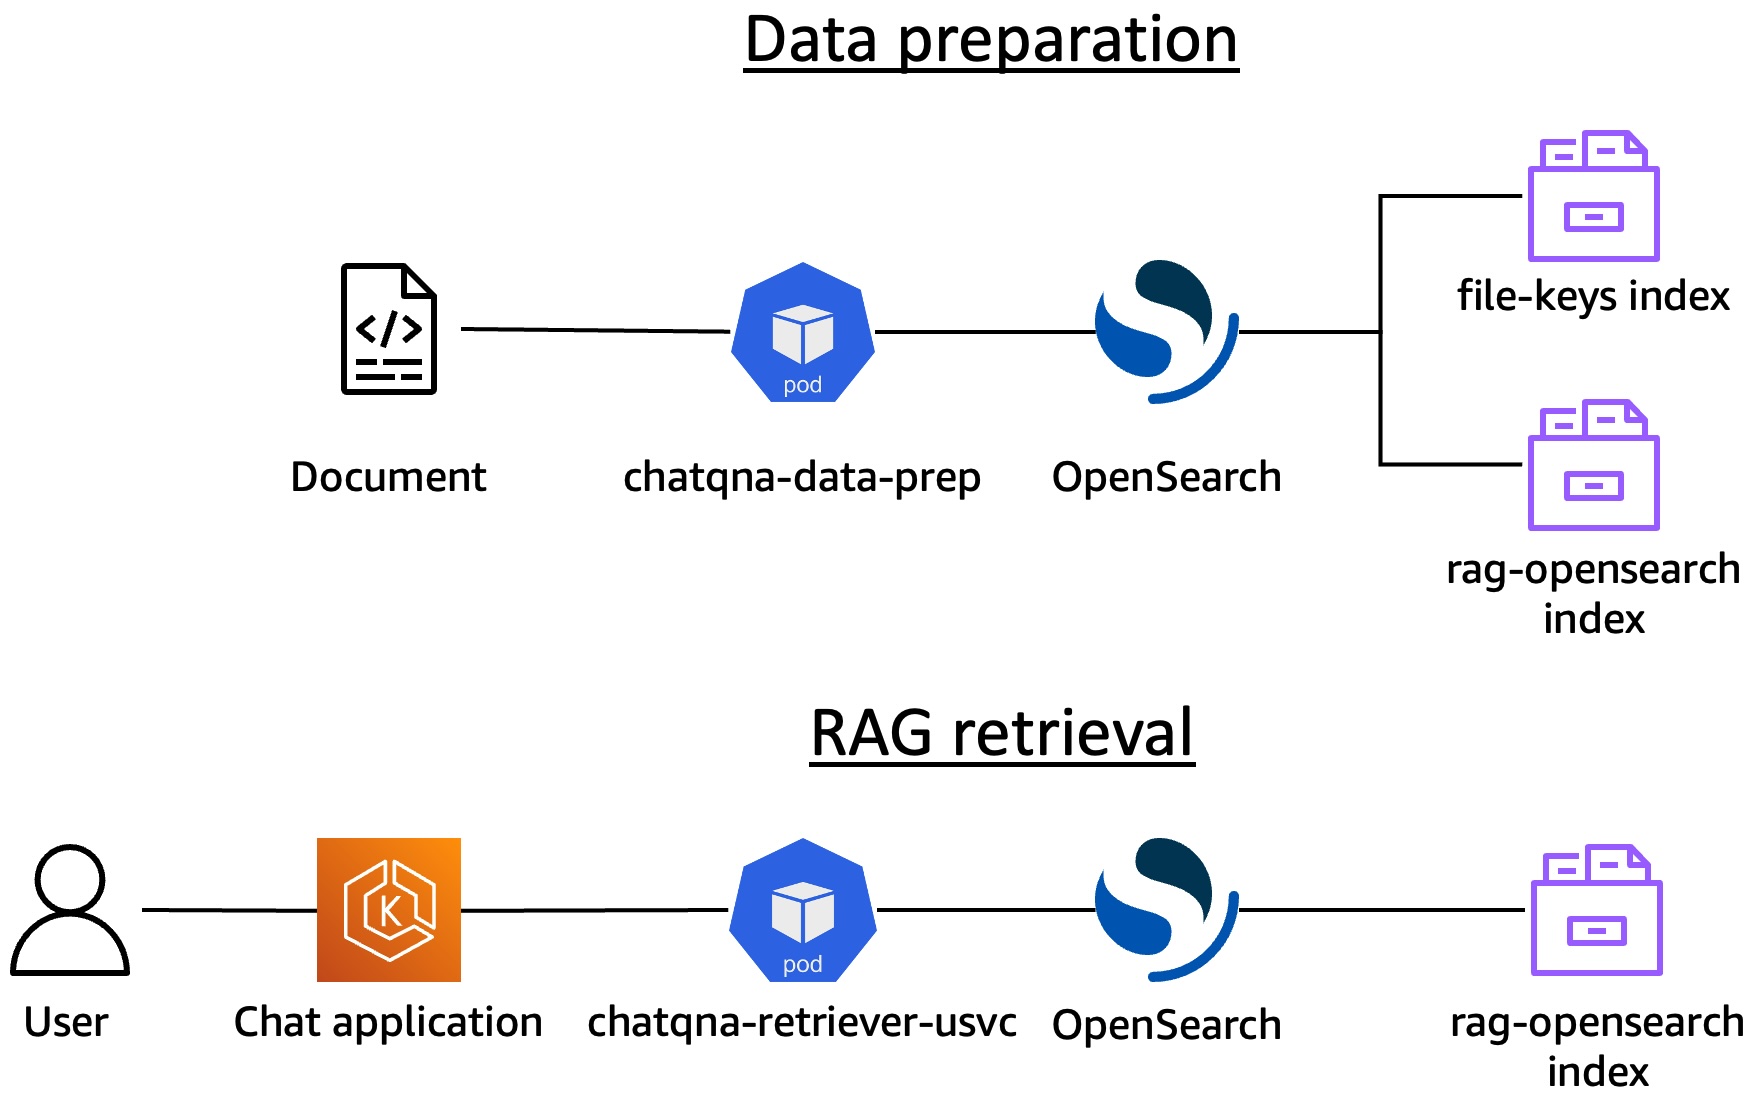
Much of the deployment and components for ChatQnA are identical when you use OpenSearch as a back end, compared with other vector database back ends. OPEA contains components for preparing and sending data to the vector database (chatqna-data-prep) and for retrieving data from the vector database (chatqna-retriever-usvc). You can find the OpenSearch implementations for these components on GitHub.
Schematically, you are now talking to OpenSearch via the OpenSearch-specific components:
Learn about OpenSearch’s distributed system
OpenSearch is a distributed database, that runs on a cluster of nodes. The nodes in an OpenSearch cluster can take on various roles, and requests are routed based on the roles of the nodes. Nodes can have more than one role and act according to all of the roles assigned to them. Some important node roles are
- Data: Nodes with the
datarole are the workers in the distributed system. They store data, and process requests, including indexing and search requests. - Cluster manager: Nodes with the
masterrole are orchestrators of the cluster. They store and distribute the cluster state, and keep track of the nodes in the system. While nodes can have bothdataandmasterroles, it’s a good idea to have different hardware for these different functions. - ML: Nodes with the
mlrole deploy and run OpenSearch’s ml-commons plugin, which can host ML models, including large language models.
You can build clusters with heterogeneous hardware and assign them roles that are best aligned with their purpose.
OpenSearch uses a Restful State Transfer (REST) API that you send to the data nodes in the OpenSearch cluster. You’ll most often use a load balancer in front of your cluster to help distribute requests across the available data nodes. When a data node receives a request, it acts as a coordinator for that request. It distributes sub-requests to the data nodes that actually hold the data to process the request (this might include the node itself). Each of the nodes receiving a sub-request processes that request, and sends a result back to the coordinator for the request. The coordinator then aggregates the responses to get a final response, which it returns to the caller.
Learn about OpenSearch’s data handling
OpenSearch’s main container structure, as we mentioned above, is the index. An index is a collection of documents comprising a body of data. You set the partitioning of the data within the index by configuring a number of shards for that index. Each shard is an independent unit (actually, an instance of Apache Lucene, a Java library that reads and writes search indices). You create the initial partitioning of the index by setting a primary shard count. When you index a document, it is assigned randomly to one of the primary shards.
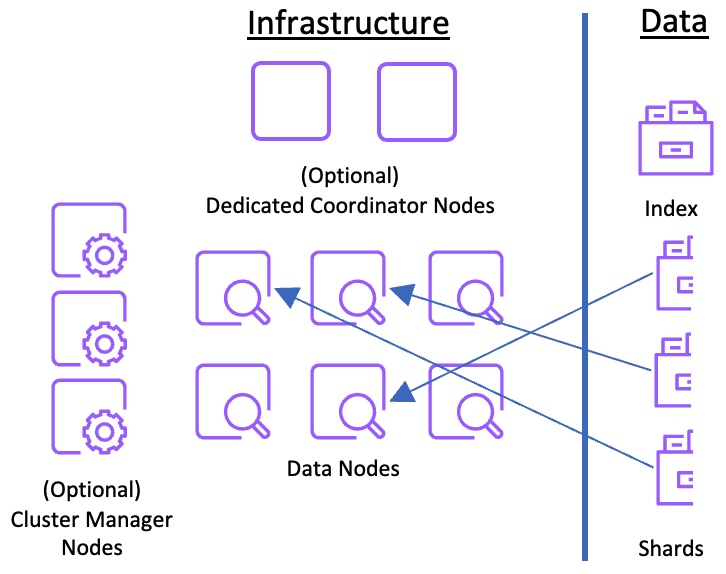
OpenSearch distributes the shards across the available data nodes in the cluster. You can also set one or more replicas for the index. Each replica is a complete copy of the set of primary shards. For example, if you have 5 primary shards and one replica, you have 10 shards in total. Your decisions about the primary shard count, the replica count, and the number of data nodes is of critical importance to the sucess of your cluster in handling your workload.
When sizing your cluster, here are some guidelines to help you achieve success.
Amazon OpenSearch Service’s documentation also includes best practices on a number of topics, including sizing OpenSearch Service domains. While these best practices are service-specific, the documentation details first principles that will help you size your self-managed domain as well.
-
First, calculate the storage needed for your metadata and vectors. You can use
# of bytes per dimension*# of vector dimensions*number of vectors * (1 + # of replicas)as the value for your vector storage need. For example, if you are using floating-point numbers (the default) for vector data, your vectors are 768 dimensions, you have 1M vectors, and you are running 1 replica, you need
4 * 768 * 1M * 2 = 6GBof vector storage.To calculate the storage need for your metadata, use
(1 + # of replicas) * size of source data in bytes * 1.10. 1.10 is an inflation factor between raw, source data size, and index size. For example, if you have 100 GB of metadata, with one replica, you need2 * 100 GB * 1.10 = 220 GBof index storage.Sum these two values to get the total storage need.
-
Set the primary shard count (for search and vector workloads) so that each shard has between 10 GB and 30 GB of index. By keeping data sizes in this range, you will be able more easily to scale horizontally as you increase the size (and along with replicas) the throughput of your workload
-
Deploy instances so that the shard:CPU ratio is 1:1.5 — you should have 1.5 CPUs for every shard. Remember, this is a guideline, and a conservative guideline at that. You will almost always be able to scale in from this ratio. With a ratio of 1:1.5, you will see ~67% utilization for your workload if it drives 100% CPU per shard. This leaves overhead for additional, cluster tasks.
-
Set your shard count to provide enough RAM for your vector workload. This blog post gives formulas to determine how much RAM you need to store your vectors. OpenSearch (by default) uses 1/2 of available RAM, up to the long pointer limit (usually 31.5 GB, but depends on the operating system) for the Java heap. Half of the remaining, off-heap RAM is dedicated to vector storage (you can change this ratio or use OpenSearch’s disk-based vector search to optimize RAM use).
Verify the OpenSearch Deployment
To verify the deployment, you will use Kubernetes port forwarding to call the various microservices. You can verify the OpenSearch deployment is working by executing a GET request against the base URL. OpenSearch listens on port 9200. Use the following command to map port 9200 to your local port 9200. (If your Cloud Shell terminal has terminated, click in the window or open a new terminal from the AWS console.)
kubectl port-forward -n opensearch svc/opensearch-cluster-master 9200:9200 &
In this section of the guide, you will use port forwarding for a number of services. The port forwarding takes a few seconds to start, be sure to wait for a confirmation line looking like this: Forwarding from 127.0.0.1:9200 -> 9200.
Now you can query OpenSearch directly on localhost:9200. OpenSearch supports encrypted communication via Transport Layer Security (TLS), and ships with a demo certificate that is not signed by an authority. For demo purposes, you’ll use the --insecure option for curl. OpenSearch’s fine-grained access control supports an internal user/password database for basic HTTP authentication. It can also integrate with Security Assertion Markup Language (SAML) identity providers for login to OpenSearch Dashboards (OpenSearch’s user interface). You’ll provide HTTP authentication with your curl request.
A query to / simply returns cluster health and information.
curl -XGET https://localhost:9200/ --insecure -u admin:strongOpea0!
You should receive output like this:
{
  "name" : "opensearch-cluster-master-0",
  "cluster_name" : "opensearch-cluster",
  "cluster_uuid" : "KGhQklGiSMCXKb7qrMYukQ",
  "version" : {
    "distribution" : "opensearch",
    "number" : "2.17.0",
    "build_type" : "tar",
    "build_hash" : "8586481dc99b1740ca3c7c966aee15ad0fc7b412",
    "build_date" : "2024-09-13T01:04:14.707418737Z",
    "build_snapshot" : false,
    "lucene_version" : "9.11.1",
    "minimum_wire_compatibility_version" : "7.10.0",
    "minimum_index_compatibility_version" : "7.0.0"
  },
  "tagline" : "The OpenSearch Project: https://opensearch.org/"
}
Congratulations! You’ve created an OpenSearch-backed deployment of OPEA’s ChatQnA example!
Working with OPEA ChatQnA and OpenSearch
You can work with the individual microservices in the OpenSearch deployment in the same way you did with the Redis deployment. In this section you’ll add a sample document to OpenSearch via the chatqna-data-prep service, generate an embedding, and query OpenSearch with that embedding via the chatqna-retriever-usvc. As you work through this section of the guide, you’ll see that choosing OpenSearch as your vector DB is somewhat transparent at the data prep and retriever levels. The OpenSearch service provides a facade that enables other OPEA components to “just use it”.
Upload a document to OpenSearch
Download the sample pdf document with the below command
curl -C - -O https://raw.githubusercontent.com/opea-project/GenAIComps/main/comps/third_parties/pathway/src/data/nke-10k-2023.pdf
Now you can use the chatqna-data-prep service to send that document to OpenSearch. Use the following command to map local port 6007 to the services port 6007.
kubectl port-forward -n opensearch svc/chatqna-data-prep 6007:6007 &
Wait until you see the message Forwarding from 127.0.0.1:6007 -> 6007, and then send the document.
curl -X POST "localhost:6007/v1/dataprep" \
     -H "Content-Type: multipart/form-data" \
     -F "files=@./nke-10k-2023.pdf"
Data prep will take about 30 seconds processing the document. When it’s done you will see
{"status": 200, "message": "Data preparation succeeded"}
To see how OPEA uses OpenSearch, you can query OpenSearch directly. One of OpenSearch’s core sets of APIs is the Compact Aligned Text (_cat) API. The _cat API (most OpenSearch APIs begin with an underscore, _) is an administrative API that retrieves information on your cluster, indices, nodes, shards, and more. To see the indices in OpenSearch, execute the following command (if your Cloud Shell has terminated, you’ll need to re-establish the port forwarding. See above for instructions)
curl -XGET 'https://localhost:9200/_cat/indices?v' --insecure -u admin:strongOpea0!
You should see output like this:
health status index                        uuid                   pri rep docs.count docs.deleted store.size pri.store.size
green  open   .plugins-ml-config           MsiD3PGmQeOxOJB8gr78-w   1   0          1            0      3.9kb          3.9kb
green  open   .opensearch-observability    4FU6LjzNT7yt5Ighq06avg   1   0          0            0       208b           208b
yellow open   security-auditlog-2024.11.26 S9jw-LxBRn6XP4ymgDdgTQ   1   1          2            0     29.6kb         29.6kb
yellow open   security-auditlog-2024.11.25 bymUvRXySJKuqBWsSIU3zg   1   1         37            0    164.4kb        164.4kb
yellow open   file-keys                    SHlqJUNIQ-2bxn-pRiUvZg   1   1          1            0     27.8kb         27.8kb
yellow open   rag-opensearch               xCOi5BfERr2UrgVybIWuqw   1   1        271            0      3.8mb          3.8mb
green  open   .opendistro_security         NN7Wvv1PSz-V9E2uBlUhDg   1   0         10            0       81kb           81kb
Examine the output and you can see several system indices, prefixed by a “.”. You can also see an audit log that you can use to audit API usage. Finally, the rag-opensearch and file-keys indices contain the data from ChatQnA.
You’ll notice that several indices are marked with health yellow. OpenSearch marks an index yellow when a shard from that index cannot be deployed. The yellow indices have 1 primary shard (pri) and 1 replica (rep), but there’s only one node in the cluster. OpenSearch always allocates primary and replicas of the same shard to different nodes. Since there’s only one node, OpenSearch can’t allocate the replica, and the index status is yellow. When you create OpenSearch clusters, you should always use at least 1 replica (providing within-cluster redundancy, and enabling automatic recovery when a node fails), and at least 2 data nodes.
The pri.store.size gives the size in bytes of the on-disk data for all of the primary shards for the index. store.size is the size on disk, including replicas, for the index. Since only the primary is allocated, they’re the same for this example. docs.count is the number of OpenSearch documents. data-prep automatically chunks documents and indexes them separately, so the example Nike document has 271 chunks.
Now that there’s data loaded, you can test OpenSearch’s retrieval with the retriever microservice. First, you need to use the embedding service to create an embedding for your query (“What was the Nike revenue in 2023?”). Execute the following command to get the embedding and store it in the response bash variable. Establish port forwarding for the chatqna-tei microservice:
kubectl port-forward -n opensearch svc/chatqna-tei 9800:80 &
Again, wait until you receive the Forwarding from 127.0.0.1:9800 message, then send the query text and store the embedding in the question_embedding shell variable.
question_embedding=$(curl localhost:9800/embed \
    -X POST \
    -d '{"inputs":"What was the Nike revenue in 2023?"}' \
    -H 'Content-Type: application/json')
To verify that this call succeeded, you can use echo $question_embedding to see the vector embedding. Now use the following command to call the retriever microservice and find matching documents from OpenSearch and store them in the similar_docs bash variable. Establish port forwarding:
kubectl port-forward -n opensearch svc/chatqna-retriever-usvc 9801:7000 &
After the shell acknowledges that it’s forwarding, run the retrieval
similar_docs=$(curl http://localhost:9801/v1/retrieval \
    -X POST \
    -d "{\"text\":\"test\",\"embedding\":${question_embedding}}" \
    -H 'Content-Type: application/json')
Again, you can verify the retrieval with echo $similar_docs | jq .. Now you can explore the reranker, contacting it directly with the similar docs and compare with the question What was Nike Revenue in 2023?. The chatqna-teirerank service expects an array of text blocks. Execute the following commands to reformat $similar_docs and save the result in the local file rerank.json
texts=$(echo "$similar_docs" | jq -r '[.retrieved_docs[].text | @json]')
echo "{\"query\":\"What was Nike Revenue in 2023?\", \"texts\": $texts}" | jq -c . > rerank.json
Now establish port forwarding for the chatqna-teirerank service.
kubectl port-forward -n opensearch svc/chatqna-teirerank 9802:80 &
Once the shell responds that it’s forwarding, execute the following command to see the rerank results
curl -X POST localhost:9802/rerank \
  -d @rerank.json\
  -H 'Content-Type: application/json'
You should see output like this. In this case, the top-retrieved item still has the best score after reranking, followed by the third, first, and second.
[{"index":0,"score":0.9984302},{"index":3,"score":0.9972289},{"index":1,"score":0.9776342},{"index":2,"score":0.84730965}]
OPEA will use the first result as context for the chatqna-tgi service. You’ve now contacted each of the microservices and seen how the data and query are transformed during OPEA’s query handling.
As a final test, you can send the query to the load balancer to see the result. Use the following command to get the address of the load balancer:
kubectl get ingress -n opensearch
You should see output like this
opensearch-ingress alb * opensearch-ingress-156457628.us-east-2.elb.amazonaws.com 80 46h
Copy the address of the load balancer and paste it in the below command to see ChatQnA’s response for the query “What was the revenue of Nike in 2023?”
curl http://[YOUR INGRESS DNS NAME]/v1/chatqna -H "Content-Type: application/json" -d '{"messages": "What was the revenue of Nike in 2023?"}'
You should see streaming text with the answer: “In fiscal 2023, NIKE, Inc. Revenues were $51.2 billion.”
As a final test, copy-paste the ingress URL to your browser, where you can try out the query from the UI.
Conclusion
In this task you’ve deployed OpenSearch as the vector database and tested its integration with OPEA. You connected directly to the data prep, embedding, and retriever microservices to understand more how OpenSearch integrates with these components. Then you dove into OpenSearch’s query API to see some of its capabilities for retrieving documents. In the Explore OpenSearch (Optional) module, you can dive deeper into OpenSearch’s API to see some of the different kinds of queries you can run.